
Interior Stairway
On a building that is this complex and detailed, I like to start with the interior and work my way out to the walls rather than start with an empty shell and work inside. Some spaces are going to get pretty tight anyway as time goes on, so I like to finish things out right down to the paint then build on from there.
The first part I made for the interior was the curved stairway. This was thanks to Marsha at Enchanticals for the clever idea :)
I ripped pine strips for the treads & risers then glued them in long extrusions. I then cut the treads to a equal width using a stop block on the band saw. That put a slight V shape on one side which became the inner radius. Everything is constructed on a scrap of 1/4 luan to be cut to finished size later.

To keep the stairway fabrication consistent I found a glass mug with a fairly parallel vertical wall. Each tread is just glued & weighted to the tread below and allowed to dry before adding the next. As the stairs grew I raised the glass with a block of wood underneath.
I did a drawing with a cross section of the entire house on graph paper to work out the stair count, etc to make it easier later on. The landing will become the main floor, the bottom of the stairs will be an implied basement. That will end on a stone floor and be the 'kitchen' area with mainly 'old world' brick & stone construction

Stair Rail Assembly
From the landing on up there was no support under the stairs because I wanted the option to detail underneath. It was somewhat flexible so I made the handrail pieces long enough to reach all the way to the floor. That helped stabilize the piece.
The tall vertical piece is a 3/4 'post' (9"x9" to scale) that will accept the stairway as it continues back around itself. I pre cut a vertical notch in it to lock in the front door, which is set up at the same height as the stair landing. Everything is glued down to the working surface which in turn will be glued to the model base.
The tabs of wood under the landing are just to glue in the sub floor of the first level. Then the finished surface will be 'planks' ripped on the table saw and glued to that sub floor. This locks everything together really tight so it lasts for years.


 When complete, its painting, age and weathering for that "Old World" type of look. Very little is air brushed because there are so many tight places to get up into, under and behind. When I do larger houses with interiors, I like to build from the inside out, with paint, textures and finishes completely done as I go along. Exterior walls are actually the last built.
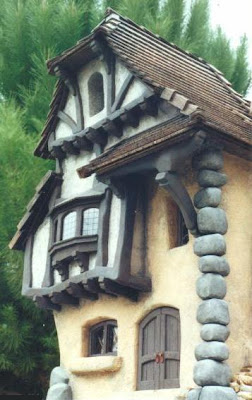 I hope this has been informative! More will follow as I try to show some step by step on construction ideas for these and other styles of miniatures. Most people don't have access to the larger power tools and dedicated space, so I focus more on the architectural elements rather than the details that dress it out (foliage, furniture, collectibles, etc). I like to get it out to the collector to finish it out and personalize it however they wish.